Create & Deploy an Express REST API to a DigitalOcean Server
In this article, we'll walk you through how to create a REST API using Express and Node.js. The API you create will have two basic GET and POST endpoints that return test data from the JSON Placeholder public API.
We'll also deploy the application to a DigitalOcean server in the cloud with a custom domain, HTTPS/SSL encryption using Certbot and Lets Encrypt, keep your application running forever with PM2, use Nginx as a reverse proxy, and show you how to deploy future code changes to production.
Let's get started!
Table of Contents
- Create a Node.js & Express REST API
- Upload the Application to GitHub
- Set-Up & Configure a DigitalOcean Server
- Configure a Domain Name
- Install & Configure Nginx
- Configure SSL/HTTPS With Lets Encrypt and Certbot
- Configure & Deploy Your Node.js Application
- Set-Up Nginx as a Reverse Proxy
- How to Deploy Application Code Updates
Step 1 - Create a Node.js & Express REST API
Before anything else, we need to create a REST API using Node.js and Express.
To follow along with the code in this article, you'll need to have Node.js installed on your local development machine.
If needed, we wrote a guide on getting Node.js installed.
Create a Node.js Project
Before we can start coding, let's create a project folder and install the npm package dependencies we'll need to create our REST API.
First, we need to create a directory to hold the application in.
You can create a new directory with this command (replace app with your directory name):
mkdir app
And then move into the directory you just created with the cd command:
cd app
Now, let's use the npm init command to create a package.json file for your application. You can get more information on the purpose and components of the package.json file here.
Run the following command (make sure you're in the directory you created):
npm init
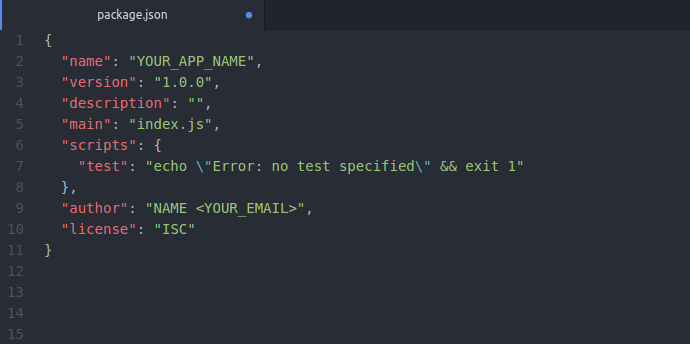
You'll be prompted for several things, like the name, version, and description of your application. You can hit ENTER for each of them to accept the defaults.
Your directory should now have a package.json file in it. It should look similar to the image below.
Now we have a Node.js application created and we're ready to move on to creating our Express HTTP server!
Create an HTTP Server With Basic Routing
At the core of any REST API is a functioning HTTP server.
In this tutorial, we'll use the Express npm package. Express is a web application framework built in Node.js that will make creating an HTTP server quick and easy.
You can install Express with this command:
npm install express --save
Both of those commands will install the npm package to your node_modules directory. And since we used the --save flag, it will be listed in the "dependencies" section of your package.json file.
Once the Express.js package is installed, we need to create an index.js file that will serve as the entry point to our application.
You can create the new file with this command:
touch index.js
Then, open the file in your favorite text editor and add the following code:
const express = require("express")

const PORT = process.env.PORT || 5000
const app = express()

app.get("/", (req, res) => {
  res.send("Welcome to your App!")
})

app.listen(PORT, function () {
  console.log(`Express server listening on port ${PORT}`)
})
Then, we need to add a script to our package.json file that will handle starting our application.
Open your package.json file and replace the "scripts" section with this code:
"scripts": {
  "start": "node index.js"
},
Save the package.json file and open your terminal.
To run the code, execute this command:
npm start
And you should see the following output in your terminal:
Express server listening on port 5000
This starts an HTTP server on port number 5000 and listens for any connections or requests. The only route we have set-up is "/", so any requests to the http://localhost:5000/ URL will respond with a "Welcome to your App!" message.
To test the root URL route ("/"), go to this URL in your browser:
http://localhost:5000
You should see a webpage with the message "Welcome to your App!" on it.
For testing purposes, try any different URL. For example:
http://localhost:5000/users
You should see a "Cannot GET /users" message.
That message is shown because we haven't configured that route yet. In the next step, we'll get additional routes like that configured.
Add GET & POST Routes to Our API
Now that we have a basic API built, we can now add some GET and POST routes that return data.
To get testing data to work with, we'll use the free Json Placeholder service. They provide free test data for prototyping REST APIs.
To retrieve the data from Json Placeholder, we'll use the Axios npm package. It's a promise-based HTTP client that will do the heavy lifting for us when we make requests.
You can install it with this command:
npm install axios --save
When that's done installing, we're ready to write some code.
Add a GET Request
First, let's add a GET endpoint to our Express HTTP server. Open your index.js again and update its code to look like this:
const express = require("express")
const axios = require("axios")

const PORT = process.env.PORT || 5000
const app = express()

app.get("/", (req, res) => {
  res.send("Welcome to your App!")
})

app.get("/users", (req, res) => {
  axios.get("https://jsonplaceholder.typicode.com/users")
    .then(function(response) {
      res.json(response.data)
    }).catch(function(error) {
      res.json("Error occured!")
  })
})

app.listen(PORT, function () {
  console.log(`Express server listening on port ${PORT}`)
})
We made a few changes to our index.js file, so let's go over them.
The first thing we did was import the axios npm package we installed.
Then, we added a new GET request route to our server named /users using the app.get() function. This route will respond to any GET requests to the URL http://localhost:5000/users.
Inside the new route, we use Axios to make a request to the JSON Placeholder API. That request will return JSON data with a big array of sample users. When we receive that data back from JSON Placeholder, we send a res.json() response back with the JSON data.
Let's test the code out and verify that everything works the way we expect it to!
Make sure you save the index.js file and restart your application with the npm start command:
npm start
Then, open your browser to the URL for the new route:
http://localhost:5000/users
If everything went as planned, you should see the user data displayed on your page as JSON data.
Add a POST Request
Awesome! You just created an endpoint to our REST API that takes a GET request and returns data.
Next, let's add another route that takes POST data requests. Same as before, we'll use the JSON Placeholder API to return sample JSON data.
To handle the data passed to the POST data requests, we need to install the Body-Parser npm package. This package will parse the incoming requests to our REST API and make the data available for us to use.
You can install it with this command:
npm install body-parser --save
When that's done installing, open your index.js file in a text editor again and update the code to the following:
const express = require("express")
const axios = require("axios")
const bodyParser = require("body-parser")

const PORT = process.env.PORT || 5000
const app = express()

app.use(bodyParser.urlencoded({ extended: true }))
app.use(bodyParser.json())

app.get("/", (req, res) => {
  res.send("Welcome to your App!")
})

app.get("/users", (req, res) => {
  axios.get("https://jsonplaceholder.typicode.com/users")
    .then(function(response) {
      res.json(response.data)
    }).catch(function(error) {
      res.json("Error occured!")
  })
})

app.post("/getUserById", (req, res) => {
  if (!req.body.id) {
    res.json("No ID found in reqest body.")
  } else {
    axios.get(`https://jsonplaceholder.typicode.com/users/${req.body.id}`)
      .then(function(response) {
        res.json(response.data)
      }).catch(function(error) {
        res.json("Error occured!")
      })
  }
})

app.listen(PORT, function () {
  console.log(`Express server listening on port ${PORT}`)
})
Let's go over the changes we made to our index.js file.
First, we added the new body-parser npm package. Then, we added two lines to configure it:
app.use(bodyParser.urlencoded({ extended: true }))app.use(bodyParser.json())
Both of these lines get body-parser set-up and makes the data in the POST request available with the req.body work.
The last thing we added was our new POST route using the app.post() function. It takes an ID given in the request body and gets a single user from JSON Placeholder using that unique ID.
Inside the app.post() function, we first add some simple error handling. If a req.body.id value is not found, the function will return an error response.
If a req.body.id value is found, we use axios to make a request to the JSON Placeholder API. Then data is returned in the response body.
Let's test our code to make sure it's working.
Open a terminal window and execute this command to make a POST request using curl (if you're using Windows, you can download curl here):
curl --data "id=1" http://localhost:5000/getUserById
The response in your terminal should look similar to this:
{
  "id": 1,
  "name": "Leanne Graham",
  "username": "Bret",
  "email": "Sincere@april.biz",
  "address": {
    "street": "Kulas Light",
    "suite": "Apt. 556"
    "city": "Gwenborough",
    "zipcode": "92998-3874",
    "geo": {
      "lat": "-37.3159",
      "lng": "81.1496"
    }
  },
  "phone": "1-770-736-8031 x56442",
  "website": "hildegard.org",
  "company": {
    "name": "Romaguera-Crona",
    "catchPhrase": "Multi-layered client-server neural-net",
    "bs": "harness real-time e-markets"
  }
}
If everything went as planned, we now have a REST API with both a POST and GET route working locally on your machine!
Step 2 - Upload the Application to GitHub
Later on in the tutorial, we'll need to clone and run our application on a DigitalOcean server we created. And to clone the code onto the server, we'll need to have the code uploaded and stored on Github.
Once our application is stored on GitHub, we'll be able to clone and run it on your server.
Create a New Github Repository
Let's create a repository on GitHub that you can upload your project to.
First, go to https://github.com.
If you don't have a GitHub account, you'll need to create one.
Once you're logged in, click the Start a Project button.
After you press the Start a Project button, you will be redirected to another page where you can name your repository, give it a description and more.
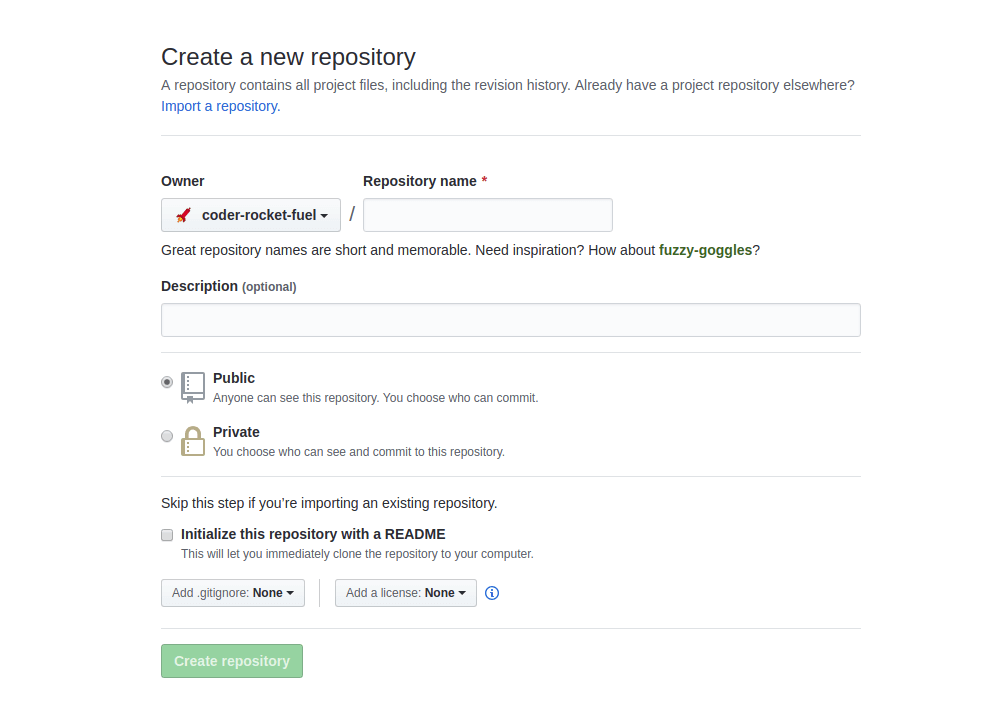
When you're done filling out the form, press the Create Repository button.
You should now have an empty repository created on Github!
Add a .gitignore File to Your Project
When we push code to Github, we want to exclude things like the node_modules directory from being uploaded. Otherwise, our project file size will be unnecessarily large. And .gitignore files can also be used to exclude files that contain sensitive information like passwords and other credentials.
Open a terminal and navigate to the root of your Node.js project.
Create the .gitignore file with this command:
touch .gitignore
And add this code to the file:
# dependencies
/node_modules
/.pnp
.pnp.js

# testing
/coverage

# production
/build

# misc
.DS_Store
.env.local
.env.development.local
.env.test.local
.env.production.local

npm-debug.log*
yarn-debug.log*
yarn-error.log*

.next

.env
This will stop a lot of different directories and files from being uploaded by Git, including .env files, npm debug files, and the node_modules directory.
You can find more information on ignoring files here: https://help.github.com/articles/ignoring-files/.
Push Code to Github Repository
Open a terminal and make sure you're in the root of your Node.js project.
And then run the git init command to initialize the project as a Git repository on your local machine:
git init
Then, we need to set the remote origin for your local repository. This gives Git a URL for where your code is stored remotely for this repository. When you push changes, this is the URL that the code will be uploaded to.
git remote add origin https://github.com/your_github_username/name_of_your_repository.git
Next, we need to use the add command to stage the files in the repository.
git add .
This stages all of the files in the directory, besides the ones we told Git to exclude in the .gitignore file.
We can check on the state of what files are staged with this command:
git status
You should see some files listed after running that command.
Next, we need to make the first commit for our project.
This will create a new save point in the history of the repository and tells Git how to store our code for when we reference it in the future.
git commit -m "First commit."
You can replace the commit message with whatever description for the save point you want. The message should explain why you're committing this code. Whether you're describing the new page you added or a bug that you fixed, this information will help your collaborators understand the purpose of the changes.
Now that we've completed an add and commit successfully, you're ready to send the changes to the remote repository URL we configured earlier. You would do this by issuing a push command.
The command appears as follows:
git push origin master
It may ask you for your Github username and password as authentication.
Once that command has finished, go back to your Github repository page in your browser. You'll notice that your code is visible on that page.
We'll come back to this repository later on in the tutorial after we have set-up our server and are ready to clone the application.
Step 3 - Set-Up & Configure a DigitalOcean Server
We are now ready to set-up and configure a VPS (Virtual Private Server) in the cloud to host our REST API on. There are a lot of companies that provide VPS as a service, but we'll use DigitalOcean. You can use any other VPS service provider you wish, but some of the steps in this tutorial will be slightly different for you.
To start, you need to create an account on DigitalOcean or log in to your existing account.
For a FREE $200 CREDIT FOR 60 DAYS, use this link: https://m.do.co/c/ce20017d8588.
They will ask you for a credit card, but you can cancel anytime before the 60 days ends and not be charged anything.
Create New Droplet on DigitalOcean
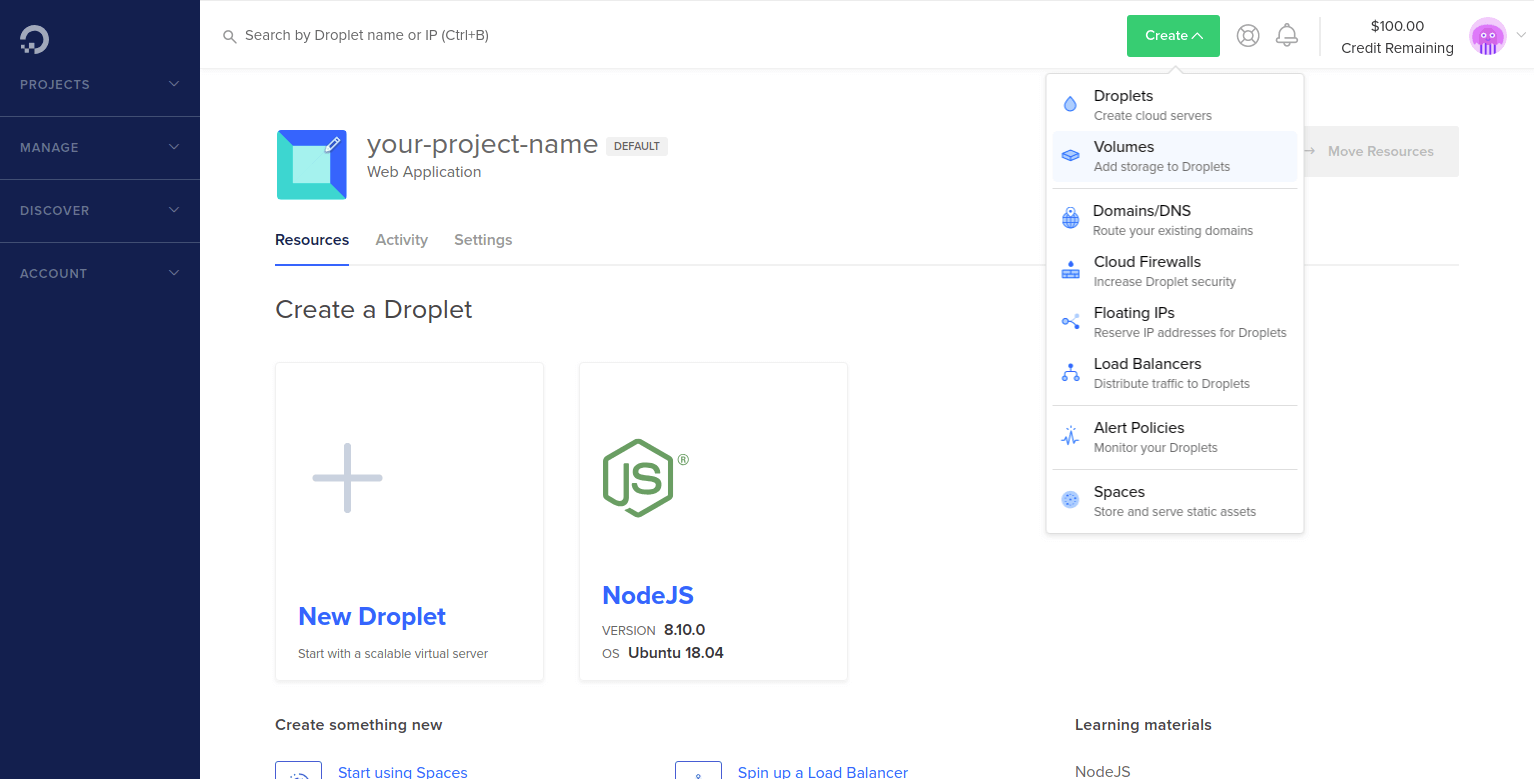
After logging in or successfully signing up for a new account, open the Create drop-down menu and click the Droplets link.
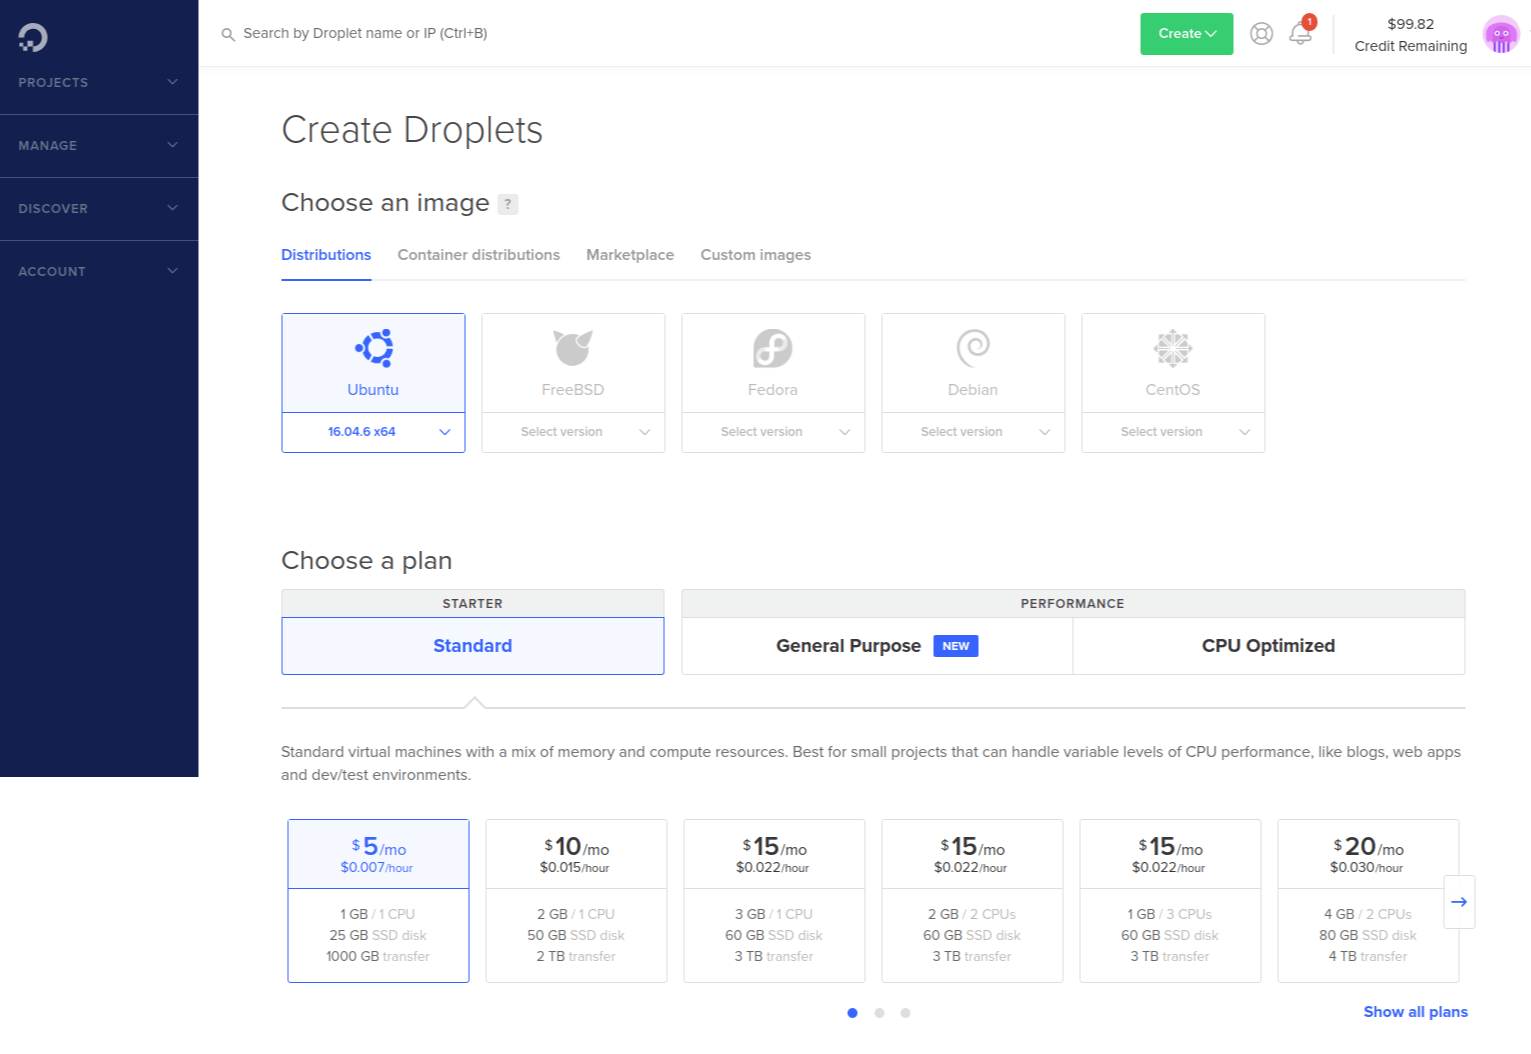
On the Create Droplets page, select the Ubuntu operating system. And choose the $5/month plan, which will give us plenty of computing power to start with.
There are a few more options on that page to fill out.
When you're done selecting options, hit the Create Droplet button.
When the Droplet is fully up and running, the control panel will display it's IP address.
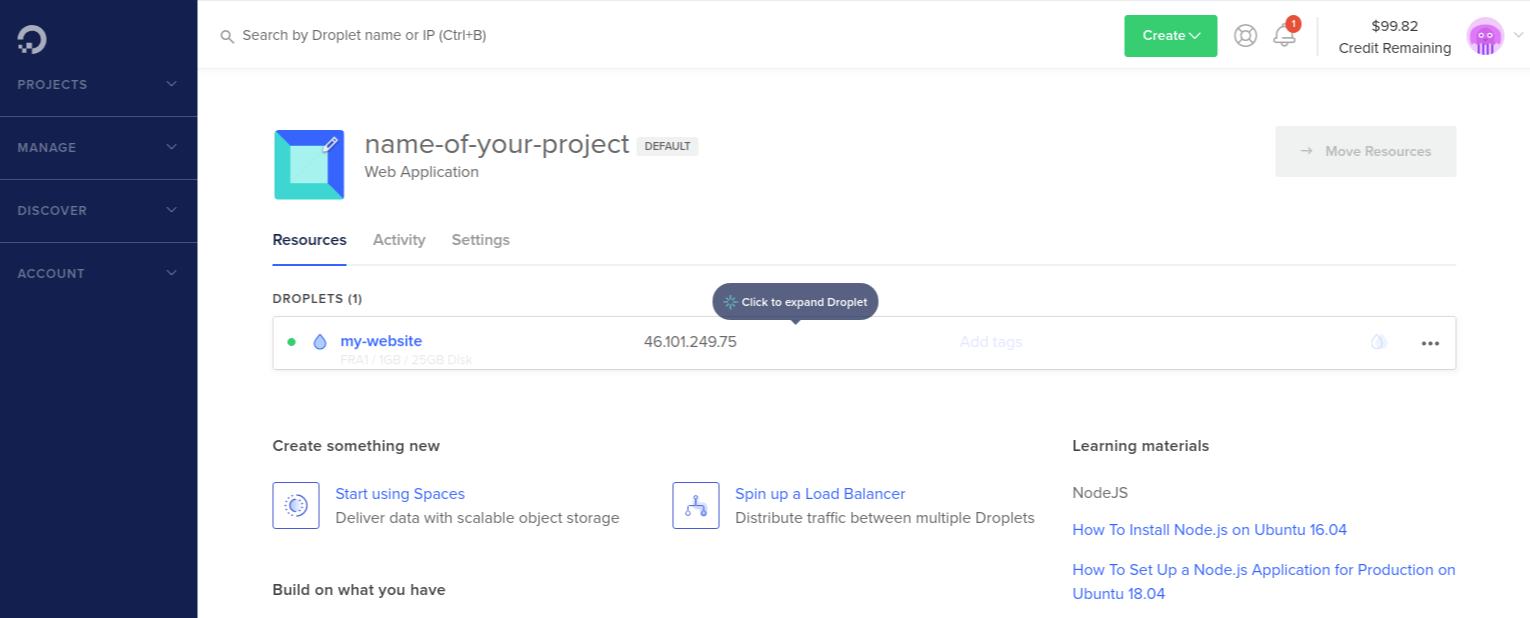
Your server is now up and running!
In the next step, we'll start the configuration process.
Root Login
To set-up our server, you'll need both the IP address of the server and the private key (password) for the root user's account. After creating your droplet, DigitalOcean should have sent you an email with information about your server. You'll need that information for the next steps.
Sometimes their emails take a while to come through, so be patient if you haven't received it yet.
To log into your server, open a terminal (Ctrl+Alt+T for Linux) on your local machine. Once you have a terminal open, use the following command to SSH in as the root user (replace server_ip_address with your server's public IP address):
ssh root@server_ip_address
Accept the warning about host authenticity, if it appears, and provide your root password (will be listed in the email from DigitalOcean).
If it's your first time logging into the server with a password, you will also be asked to change the root password.
The root user in a Linux environment has very broad privileges and, for that reason, you're discouraged from using it regularly. This is because very destructive changes (even by accident) can be made while using it.
Therefore, in the next step we are going to create an alternative account with limited scope that will be used for daily work.
Create a New User
Logged in as root, we can create a new user account that will be used to log in from this point forward. You can create a new user with the following command (substitute bob with your username):
adduser bob
You'll be asked some questions starting with the password. Choose a strong password and fill in any of the optional information after that. You can just hit ENTER repeatedly to skip the rest of the questions after that.
Give Your New User Root Privileges
You now have a new user account with regular account privileges. But you might occasionally need to do administrative tasks that require root privileges. So, instead of logging out of your normal user and logging back in as the root account, we can give the normal account the ability to run root privileged commands when you need to by adding sudo before each command.
To do this, add your new user to the sudo group. As root, run the following command to add your user to the sudo group (substitute bob with your username):
usermod -aG sudo bob
Now your user can run commands with root privileges!
The next server setup steps help increase the security of your server.
They are optional but highly recommended.
Add Public Key Authentication
By setting up public-key authentication for the new user, it will increase our server's security by requiring a private SSH key to login in.
Generate a Key Pair
If you don't already have an SSH key pair, which consists of a public and private key, you need to generate one. If you already have a key that you want to use, skip to the Copy the Public Key step.
To generate a new key pair, enter the following command at the terminal of your LOCAL MACHINE:
ssh-keygen
You'll receive an output similar to the following:
Generating public/private rsa key pair.
Enter file in which to save the key (/Users/yourusername/.ssh/id_rsa):
Press ENTER to accept the default file name and path.
Next, you'll be prompted to enter a password to secure the newly created key. You can either create a password or leave it blank. This generates a private key, id_rsa, and a public key, id_rsa.pub, in the .ssh directory of your home directory.
Copy the Public Key
Now that you have the SSH key pair on our local machine, you need to copy our public key to the server.
Option 1: SSH-Copy-Id
If your local machine has the ssh-copy-id script installed, you can use it to install your public key to any user that you have login credentials for. If not, use Option 2 to install the key manually.
Still on your local machine, type the following command:
ssh-copy-id bob@server_ip_address
You will be asked for the user's password. Then, your public key will be added to the server user's .ssh/authorized_keys file. The corresponding private key can now be used to log into the server.
Option 2: Install the Key Manually
Assuming you generated an SSH key pair using the previous step, use the following command at the terminal of your local machine to print your public key (id_rsa.pub):
cat ~/.ssh/id_rsa.pub
This should print your public SSH key, which should look something like the following:
ssh-rsa AAAAB3NzaC1yc2EAAAADAQABAAABAQDBGTO0tsVejssuaYR5R3Y/i73SppJAhme1dH7W2c47d4gOqB4izP0+fRLfvbz/tnXFz4iOP/H6eCV05hqUhF+KYRxt9Y8tVMrpDZR2l75o6+xSbUOMu6xN+uVF0T9XzKcxmzTmnV7Na5up3QM3DoSRYX/EP3utr2+zAqpJIfKPLdA74w7g56oYWI9blpnpzxkEd3edVJOivUkpZ4JoenWManvIaSdMTJXMy3MtlQhva+j9CgguyVbUkdzK9KKEuah+pFZvaugtebsU+bllPTB0nlXGIJk98Ie9ZtxuY3nCKneB+KjKiXrAvXUPCI9mWkYS/1rggpFmu3HbXBnWSUdf localuser@machine.local
Select the public key, and copy it to your clipboard.
To enable the use of SSH key to authenticate as the new remote user, you must add the public key to a special file in the user's home directory.
On the server, as the root user, enter the following command to temporarily switch to the new user (substitute bob with your username):
su - bob
Now you will be in your new user's home directory.
Create a new directory called .ssh and restrict its permissions with the following commands:
mkdir ~/.ssh && chmod 700 ~/.ssh
Now open a file in .ssh called authorized_keys with a text editor. We will use nano to edit the file:
nano ~/.ssh/authorized_keys
Then, insert your public key (which should be in your clipboard) by pasting it into the editor.
Hit CTRL-X to exit the file, then Y to save the changes that you made, then ENTER to confirm the file name.
Now restrict the permissions of the authorized_keys file with this command:
chmod 600 ~/.ssh/authorized_keys
Type this command once to return to the root user:
exit
Now your public key is installed, and you can use SSH keys to log in as your user.
Disable Password Authentication
This step will only allow you to log into your server using the SSH key you just created. Only people who possess the private key that pairs with the public key that was installed will get into the server. This increases your server's security by disabling password-only authentication.
Only follow this step if you installed a public key in the last step. Otherwise, you'll lock yourself out of the server.
To disable password authentication, follow these steps:
As the root user or new sudo user on your server, open the SSH daemon configuration file using the following command:
sudo nano /etc/ssh/sshd_config
Find the line that says PasswordAuthentication and change its value to no. It should look like this after the change was made:
PasswordAuthentication no
Save and close the file using the method: CTRL-X, then Y, then ENTER).
To reload the SSH daemon and put our changes live, type the following command:
sudo systemctl reload sshd
Password authentication is now disabled. Now your server can only be accessed with SSH key authentication.
Test Log In Using SSH Key
On your local machine, log in to your server using the new account that we created. Use the following command (use your username and server IP address):
ssh bob@server_ip_address
Once authentication is provided to the server, you will be logged in as your new user.
Basic Firewall Set-Up
Ubuntu servers can use the UFW firewall to ensure only connections to certain services are allowed. It's a simple process to set-up a basic firewall and will improve your server's security.
You can see which applications are UFW currently allows by typing:
sudo ufw app list
This should output the following:
Available applications
 OpenSSH
We need to make sure the firewall allows SSH connections so that we can log back in next time. To allow these types of connections, type the following command:
sudo ufw allow OpenSSH
And then enable the firewall:
sudo ufw enable
Press y and then ENTER to proceed. You can see that SSH connections are still allowed by typing:
sudo ufw status
That was the last step in the initial setup for our server.
Step 4 - Configure a Domain Name
To setup a domain, we need to do two things. One, you need to purchase a domain name from a domain name registrar. Second, you need to setup DNS (Domain Name System) records for your domain by using a DNS hosting service.
DigitalOcean is not a domain name registrar, but they do provide a DNS hosting service.
Therefore, make sure you have purchased a domain name from a service like GoDaddy, namecheap (my personal favorite), HostGator, name.com, or another registrar before moving on to the next step.
Configure DNS
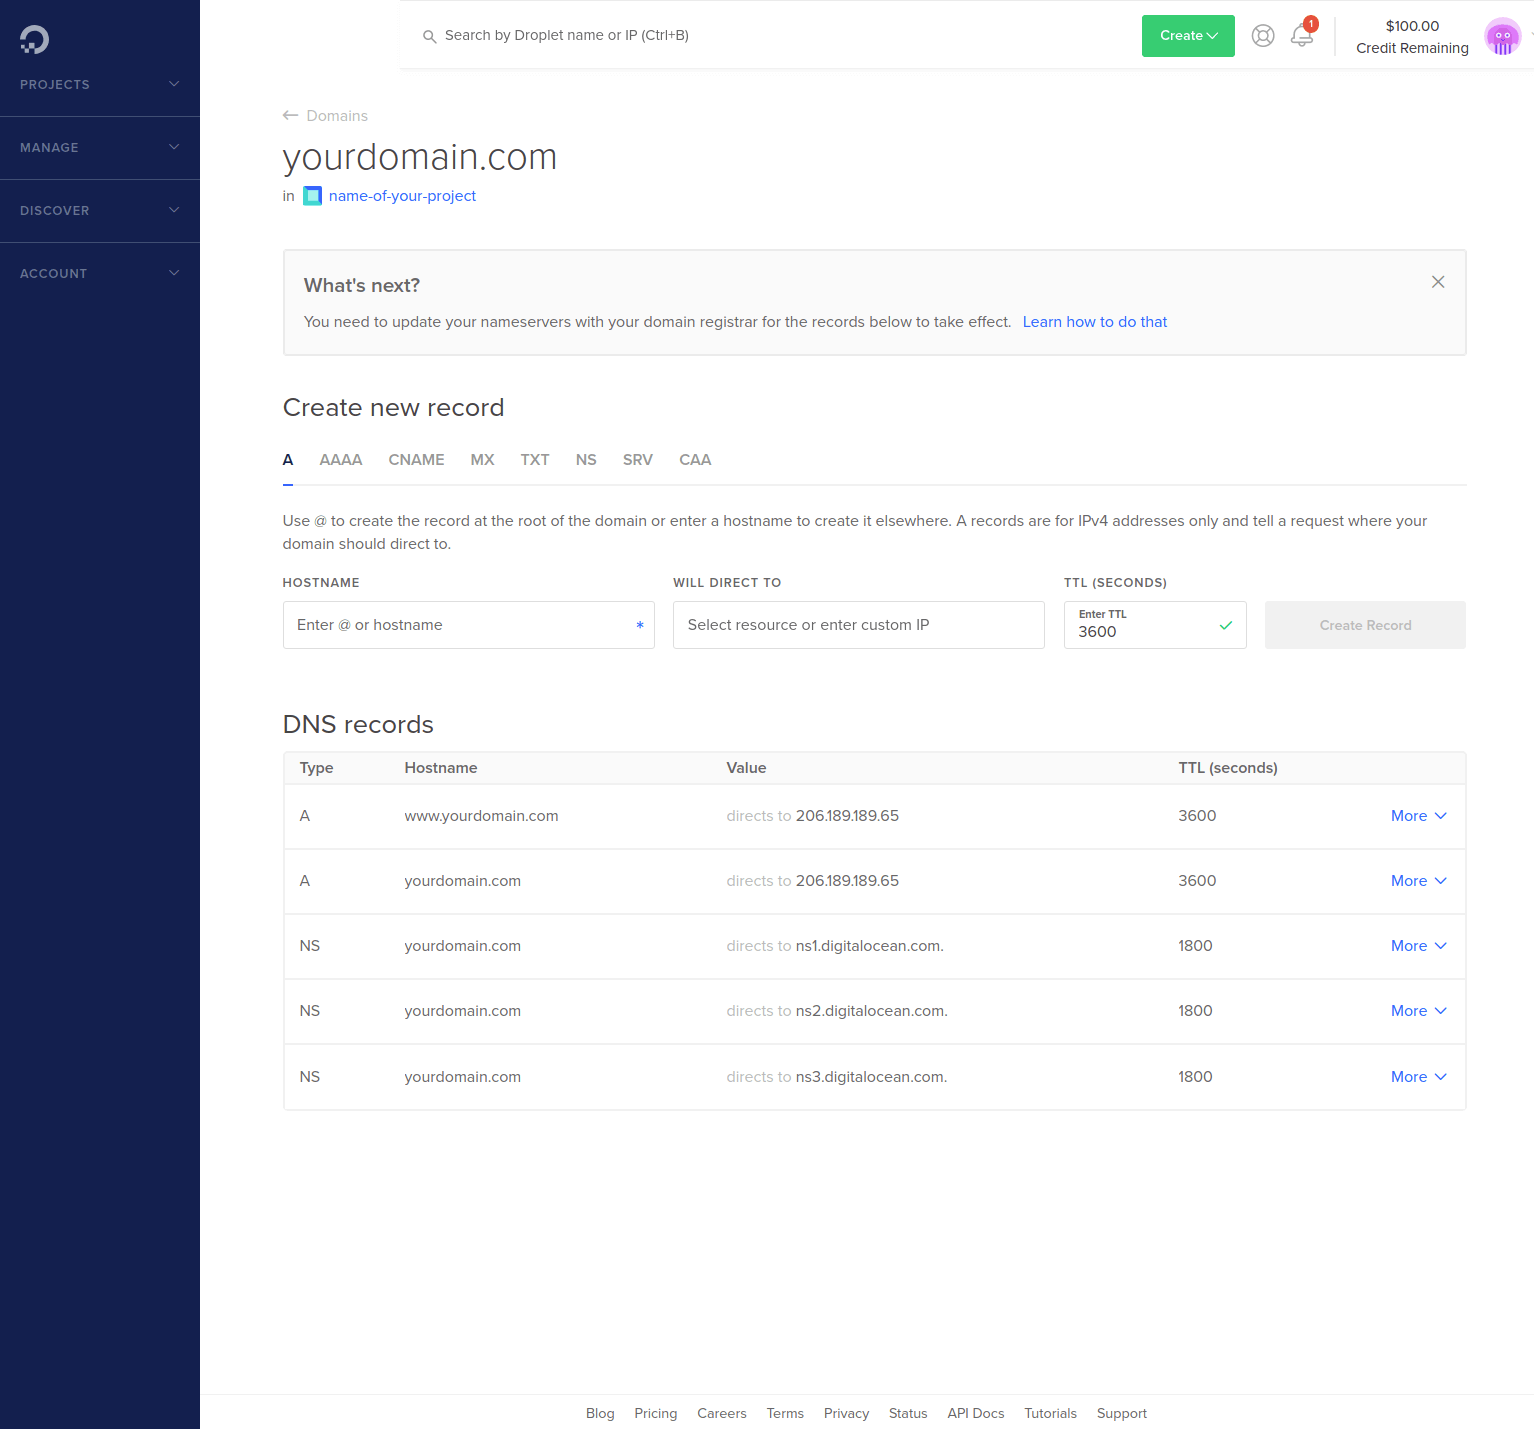
We can now configure the DNS for your domain using DigitalOcean. Open the Create drop-down menu and click the Domains/DNS link.
In the Add Domains section, enter your domain (this is usually the base only: example.com and not www.example.com) and click the Add Domain button.
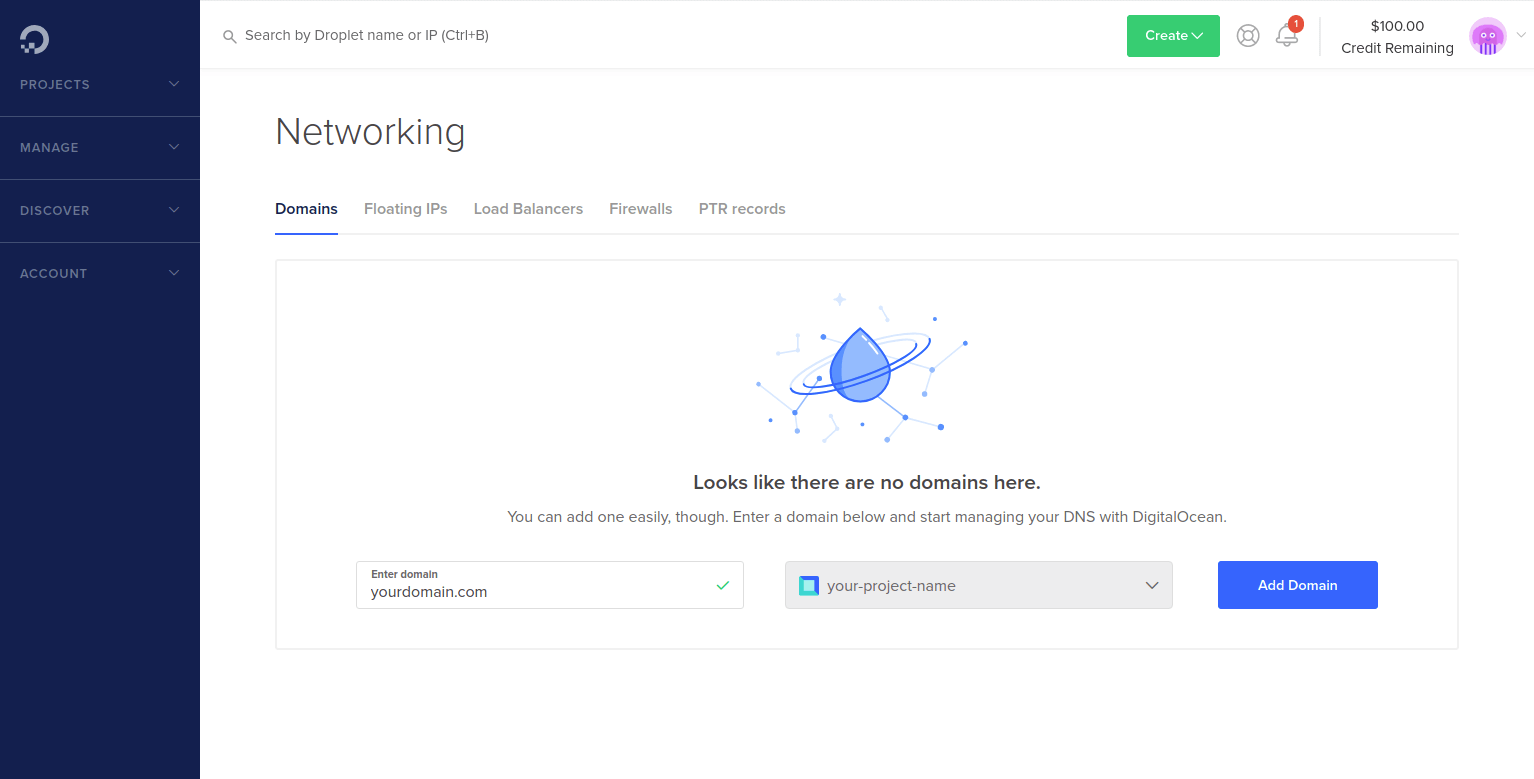
Once you have hit the Add Domain button, you will be taken to the Create new record page. You now need to add NS records for the domain on DigitalOcean servers. You'll only be adding A records, which maps an IPv4 address to a domain name. This will determine where to direct any requests for your domain name.
Add two A records for our domain.
For the first one, enter @ in the HOSTNAME field and select the server you want to point the domain name to:

For the second one, enter www in the HOSTNAME field and select the same server:

After you've added both A records, your page should look similar to this:
Point to DigitalOcean Nameservers from Your Domain Registrars
To use the DigitalOcean DNS, you'll need to update the nameservers used by your domain registrar to DigitalOcean's nameservers instead.
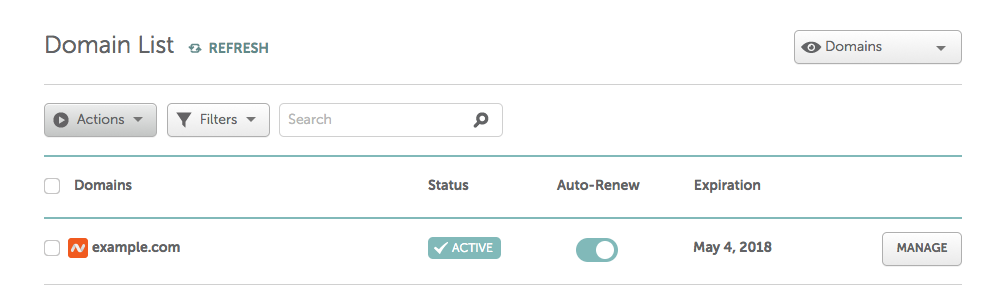
For example, to update the nameserver settings for Namecheap, follow these steps:
Sign in to your Namecheap account, then click Domain List in the left-hand column. You will be presented with a dashboard listing all of your domains. Click the Manage button of the domain you'd like to update.
In the Nameservers section of the resulting screen, select Custom DNS from the dropdown menu and enter the following nameservers:
ns1.digitalocean.comns2.digitalocean.comns3.digitalocean.com
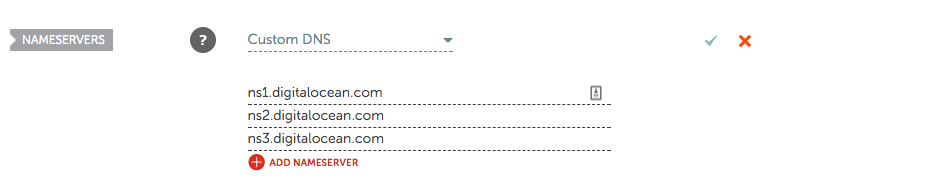
Click the green checkmark to apply your changes. Now you're ready to move on to connecting the domain with your Droplet in the DigitalOcean control panel.
It may take some time for the name server changes to propagate after you've saved them. During this time, the domain registrar communicates the changes you've made with your ISP (Internet Service Provider). In turn, your ISP caches the new nameservers to ensure quick site connections. This process usually takes about 30 minutes but could take up to a few hours depending on your registrar and your ISP's communication methods.
To set-up your domain on other registrars, there are more guides here.
Step 5 - Install & Configure Nginx
Now that your domain is pointing to your server, it's time to install Nginx and set-up our server to host web content.
We'll be using Nginx to host your website. Nginx is one of the most popular web servers and helps host some of the largest and highest-traffic sites out there. It is more resource-friendly than Apache in most cases and can be used as a web server or a reverse proxy.
Let's get Nginx configured on your server.
Install Nginx
Nginx is available in Ubuntu's default repositories, so installation is pretty straightforward.
Run the following commands to update your local apt package index so we have access to the most recent package lists:
sudo apt-get update && sudo apt-get install nginx
apt-get will install Nginx along with any other required dependencies.
Adjust the Firewall
Before we can test Nginx, we need to reconfigure our firewall software to allow access to the service. Nginx registers itself as a service with ufw, our firewall, upon installation. This makes it rather easy to allow Nginx access.
We can list the applications configurations that ufw knows how to work with by typing:
sudo ufw app list
You should get a listing of the application profiles:
Available applications:
  Nginx Full
  Nginx HTTP
  Nginx HTTPS
  OpenSSH
There are three profiles available for Nginx:
- Nginx Full: Opens both port
80(normal, unencrypted web traffic) and port443(TLS/SSL encrypted traffic) - Nginx Http: Opens only port
80(normal, unencrypted web traffic) - Nginx Https: Opens only port
443(TLS/SSL encrypted traffic)
It is recommended that you enable the most restrictive profile that will still allow the traffic you've configured. Since we haven't configured SSL for our server yet, in this guide, we will only need to allow traffic on port 80. When we setup SSL Encryption later on, we'll change these settings.
You can enable this by typing:
sudo ufw allow 'Nginx HTTP'
You can verify the change with this command:
sudo ufw status
Check Your Web Server
The Nginx web server should already be up and running.
You can check with the systemd init system to make sure the service is running by typing:
systemctl status nginx
You should see an output similar to this:
● nginx.service - A high performance web server and a reverse proxy server
  	  Loaded: loaded (/lib/systemd/system/nginx.service; enabled; vendor preset: enabled)
  	  Active: active (running) since Mon 2016-04-18 16:14:00 EDT; 4min 2s ago
  	Main PID: 12857 (nginx)
  		CGroup: /system.slice/nginx.service
  		├─12857 nginx: master process /usr/sbin/nginx -g daemon on; master_process on
  		└─12858 nginx: worker process
You can access the default Nginx landing page to confirm that the software is running properly. You can access this through your server's domain name or IP address.
When you have your server's IP address or domain, enter it into your browser's address bar:
http://server_domain_or_IP
You should see the default Nginx landing page, which should look something like this:
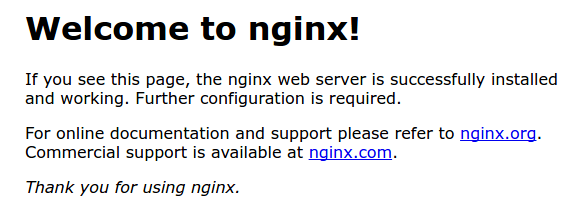
Congratulations! You now have a web server running! In the next step, we will configure SSL certificates for your domain.
Step 6 - Configure SSL/HTTPS With Lets Encrypt and Certbot
Let's Encrypt is a Certificate Authority (CA) that provides an easy way to obtain and install free SSL certificates, thereby enabling encrypted HTTPS on web servers. It simplifies the process by providing a software client, Certbot, that attempts to automate most (if not all) of the required steps. Currently, the entire process of obtaining and installing a certificate is fully automated on both Apache and Nginx.
We'll use Certbot to obtain a free SSL certificate for Nginx on Ubuntu 16.04 and set-up your certificate to renew automatically.
Install Certbot
The first step is to install the Certbot software on your server.
First, add the repository:
sudo add-apt-repository ppa:certbot/certbot
Press ENTER to accept.
Then update the package list to pick up the new Certbot repository information:
sudo apt-get update
Now install Certbot's Nginx package using the apt package manager:
sudo apt install python-certbot-nginx
Certbot is now ready to use!
Update Nginx Configuration
Certbot can automatically configure SSL for Nginx, but it needs to be able to find the correct server block in your config. It does this by looking for a server_name directive that matches the domain you're requesting a certificate for.
Open the default config file with nano or your favorite text editor:
sudo nano /etc/nginx/sites-available/default
Find the existing server_name line and replace the underscore with your domain name:
. . .

server_name example.com www.example.com;

. . .
Save the file and exit the editor.
Then, verify the syntax of your configuration edits with:
sudo nginx -t
If you get any errors, reopen the file and check for typos, then test it again.
Once your configuration's syntax is correct, reload Nginx to load the new configuration:
sudo systemctl reload nginx
Certbot will now be able to find the correct server block and update it. Next, we'll update your firewall to allow HTTPS traffic.
Allow HTTPS Access in Firewall
You'll need to adjust your ufw settings to allow HTTPS traffic.
To let in HTTPS traffic, you can allow the Nginx Full profile and then delete the redundant Nginx HTTP profile allowance. Run these two commands:
sudo ufw allow 'Nginx Full' && sudo ufw delete allow 'Nginx HTTP'
We're now ready to run Certbot and fetch the SSL certificates.
Get the SSL Certificate from Certbot
Certbot provides a variety of ways to obtain SSL certificates, through various plugins. The Nginx plugin will take care of reconfiguring Nginx and reloading the config whenever necessary:
sudo certbot --nginx -d example.com -d www.example.com
This runs Certbot with the --nginx plugin, using -d to specify the names we'd like the certificate to be valid for.
If this is your first time running Certbot, you'll be prompted to enter an email address and agree to the terms of service. After doing so, certbot will communicate with the Let's Encrypt server, then run a challenge to verify that you control the domain you're requesting a certificate for.
If that's successful, certbot will ask how you'd like to configure your HTTPS settings.
Please choose whether or not to redirect HTTP traffic to HTTPS, removing HTTP access.
-------------------------------------------------------------------------------
1: No redirect - Make no further changes to the webserver configuration.
2: Redirect - Make all requests redirect to secure HTTPS access. Choose this for
new sites, or if you're confident your site works on HTTPS. You can undo this
change by editing your web server's configuration.
-------------------------------------------------------------------------------
Select the appropriate number [1-2] then [enter] (press 'c' to cancel):
Select your choice then hit ENTER. The configuration will be updated, and Nginx will reload to pick up the new settings.
Your site is now being served over HTTPS! Enter your domain into your browser's address bar and check it out:
https://your_domain
Your certificates are now downloaded, installed, and loaded. And notice that your website is now being served over HTTPS.
Verify Certbot Auto-Renew
Let's Encrypt's certificates are only valid for 90 days. This is to encourage users to automate their certificate renewal process. The Certbot package we installed takes care of this for us by running certbot renew twice a day via a systemd timer. On non-systemd distributions, this functionality is provided by a script placed in /etc/cron.d. This task runs twice a day and will renew any certificate that's within thirty days of expiration.
To test the renewal process, you can do a dry run with Certbot:
sudo certbot renew --dry-run
If you see no errors, you're all set. When necessary, Certbot will renew your certificates and reload Nginx to pick up the changes. If the automated renewal process ever fails, Let’s Encrypt will send a message to the email you specified, warning you when your certificate is about to expire.
Step 7 - Configure & Deploy Your Node.js Application
You should now have a server running with Nginx and a domain with HTTPS/SSL encryption.
Now you're ready to install Node.js and configure your REST API application.
Install Node.js
We will install the latest LTS release of Node.js, using the NodeSource package archives.
First, you need to install the NodeSource PPA to get access to its contents. Make sure you're in your home directory. Use curl to retrieve the installation script for the Node.js 18.x archives:
curl -sL https://deb.nodesource.com/setup_18.x -o nodesource_setup.sh
And run the script using sudo:
sudo bash nodesource_setup.sh
The PPA has now been added to your configuration and your local package cache will be automatically updated. And you can now install the Node.js package in the same way that you did above:
sudo apt-get install nodejs
The nodejs package contains the nodejs binary as well as npm, so you won't need to install npm separately. But in order for some NPM packages to work, you will need to install the build-essential package:
sudo apt-get install build-essential
Node.js is now installed and ready to use!
Let's pull your application in from GitHub and get it configured!
Pull Application in From GitHub
Remember how we uploaded our application to Github earlier on in the article?
Now we need to install Git on our machine, pull the code onto our server from Github, install the NPM dependencies and then start it up.
Install Git
First, let's get Git installed on our machine.
You can install it with this command (you may need to use sudo, depending on your configuration):
sudo apt-get install git
When that's done installing, Git will be ready to use!
Clone Your Application From Github
Now that Git is installed, we can use the git clone command to pull the code onto our server.
You can use this command:
git clone https://github.com/your_github_username/name_of_your_repository.git app
Enter your Github credentials if it asks for them.
When that command finishes running, you'll have a new directory called app that holds your application code.
Configure Your Application
Awesome, we have the code pulled onto our server from Github.
Now let's get it configured.
Install NPM Dependencies
We need to install the dependencies for the application to successfully run.
First, cd into the new app directory:
cd app
And run the installation process with:
npm install
When that's finished installing, your project will be ready to start!
Start Your Application
You can start the application with the npm start command:
npm start
You should see this output in your terminal:
Express server listening on port 5000
To test the application to ensure everything is working correctly, open another terminal window on your server and make a sample request using curl:
curl http://localhost:5000
You should see this output in your terminal:
Welcome to your App!
If you don't see the right output, make sure your application is running and configured to listen on the 5000 port.
Once you have confirmed the application is working, kill the application with CTRL+C. And you can close the additional terminal window you used for making the test curl request.
Install & Configure PM2
You're now ready to install and configure PM2, which is a process manager for Node.js applications. It will allow you to keep your Node.js application alive forever, reload it without any downtime and help facilitate common system admin tasks.
Install PM2
Using NPM, you can install PM2 on your server with the following command:
sudo npm install -g pm2
The -g option tells npm to install the module globally. It will now be available across your server's system.
Manage Node.js Application with PM2
Let's get your application running using PM2. It's easy and simple to use.
Start Application Using PM2
First, use the pm2 start command to start running your application in the background using the npm start command in our package.json file:
pm2 start --name=app npm -- start
You can replace the app App name value with whatever you want PM2 to label your application as.
This also adds your application to PM2's process list, which is outputted every time an application is started. Here is what the output should look like:
[PM2] Spawning PM2 daemon
[PM2] PM2 Successfully daemonized
[PM2] Starting app.js in fork_mode (1 instance)
[PM2] Done.
┌──────────┬────┬──────┬──────┬────────┬─────────┬────────┬─────────────┬──────────┐
│ App name │ id │ mode │ pid  │ status │ restart │ uptime │ memory      │ watching │
├──────────┼────┼──────┼──────┼────────┼─────────┼────────┼─────────────┼──────────┤
│ app      │ 0  │ fork │ 3524 │ online │ 0       │ 0s     │ 21.566 MB   │ disabled │
└──────────┴────┴──────┴──────┴────────┴─────────┴────────┴─────────────┴──────────┘
Use `pm2 show <id|name>` to get more details about an app
PM2 automatically adds an App Name and a PM2 id to your application, along with other information such as PID of the process, its current state, and memory usage.
PM2 applications will be restarted automatically if the application crashes or is killed. But additional steps need to be taken for applications to start on system start up (reboot or boot). PM2 provides an easy way to do this with its startup command.
Run it with the following command:
pm2 startup systemd
In the resulting output on the last line, there will be a command that you must run with superuser privileges:
[PM2] Init System found: systemd
[PM2] You have to run this command as root. Execute the following command:
sudo env PATH=$PATH:/usr/bin /usr/lib/node_modules/pm2/bin/pm2 startup systemd -u bob --hp /home/bob
Copy and paste the command that was generated (same as above but with your username instead of bob) to have PM2 always start when your server is booted.
Your command will look similar to this:
sudo env PATH=$PATH:/usr/bin /usr/lib/node_modules/pm2/bin/pm2 startup systemd -u bob --hp /home/bob
This will create a systemd unit that will run pm2 for your user on boot. This pm2 instance, in turn, will run app.js. To check the status of the new systemd unit, use the following command:
systemctl status pm2-bob
The application is now running automatically in the background at all times on port 5000 and will automatically startup when the server boots.
For more commands and information on PM2, check out the PM2 documentation on their website.
Step 8 - Set-Up Nginx as a Reverse Proxy
Now that your application is running and listening on localhost, you need to make it so people from the outside world can access it. To achieve this, we will use Nginx as a reverse proxy.
First, you need to update the /etc/nginx/sites-available/default configuration file. Open the file with this command:
sudo nano /etc/nginx/sites-available/default
Within the server block, find the location / section. Replace the contents of the block with the following configuration:
. . .

location / {
	proxy_pass http://localhost:5000;
	proxy_http_version 1.1;
	proxy_set_header Upgrade $http_upgrade;
	proxy_set_header Connection 'upgrade';
	proxy_set_header Host $host;
	proxy_cache_bypass $http_upgrade;
}

. . .
The new configuration you just added tells the Nginx server to respond to requests at its root. Assuming the server is available at example.com, accessing https://example.com via web browser will send the request to app.js on port 5000 at localhost.
An additional location block could look like this (in the same /etc/nginx/sites-available/default file):
You can add additional location blocks to the same configuration file if you want to run additional node.js applications on the same server. All you need to do is run the application on a different port.
. . .

location /app2 {
	proxy_pass http://localhost:8081;
	proxy_http_version 1.1;
	proxy_set_header Upgrade $http_upgrade;
	proxy_set_header Connection 'upgrade';
	proxy_set_header Host $host;
	proxy_cache_bypass $http_upgrade;
}

. . .
Save and exit the file when you're finished making the changes.
Test to make sure your Nginx configuration file is clear of any errors:
sudo nginx -t
If no errors were found, restart Nginx:
sudo systemctl restart nginx
Assuming that your Node.js application is running, and your application and Nginx configurations are correct, you should now be able to access your application via the Nginx reverse proxy.
Try it out by accessing your server's URL (its public IP address or domain name):
https://your_domain
You should see the Welcome to your App! message in your browser when you visit that URL.
And you can also test out the /users route:
https://your_domain/users
If everything is working correctly, you should see the JSON data response in your browser.
Your REST API is officially all set and deployed!
Step 9 - How to Deploy Application Code Updates
What happens in the future when you make changes to your code and want to deploy it your live application?
Here's the general process for how you can make deployments:
- Make code changes on your local development machine.
- Push the changes to the Github repository.
- SSH into your DigitalOcean server.
- Remove the
appdirectory that holds the old application code. - Clone the repository from Github with the new and updated code.
- Re-install all the npm dependencies for the application.
- Reload the PM2 process manager to fully deploy all changes.
- Test your application to ensure everything works as planned.
Pretty straight-forward, right?
For demonstration purposes, we'll walk through each step of that process in the sections below.
Make Code Changes in Your Local Development Environment
Let's create some changes to the application code in your local development environment.
One change we'll make is to allow cross-origin resource sharing (CORS) to our Express API. When browsers make requests to our REST API, this will allow those HTTP requests to skip the same-origin policy and access our server directly.
We can add this to our Express application with the Cors npm package.
You can install it with this command:
npm install --save cors
Then, open your index.js file and update the code to include the cors npm package:
const express = require("express")
const axios = require("axios")
const bodyParser = require("body-parser")
const cors = require("cors")

const PORT = process.env.PORT || 5000
const app = express()

app.use(cors())

app.use(bodyParser.urlencoded({ extended: true }))
app.use(bodyParser.json())

app.get("/", (req, res) => {
  res.send("Welcome to your App!")
})

app.get("/users", (req, res) => {
  axios.get("https://jsonplaceholder.typicode.com/users")
    .then(function(response) {
      res.json(response.data)
    }).catch(function(error) {
      res.json("Error occured!")
  })
})

app.post("/getUserById", (req, res) => {
  if (!req.body.id) {
    res.json("No ID found in reqest body.")
  } else {
    axios.get(`https://jsonplaceholder.typicode.com/users/${req.body.id}`)
      .then(function(response) {
        res.json(response.data)
      }).catch(function(error) {
        res.json("Error occured!")
      })
  }
})

app.listen(PORT, function () {
  console.log(`Express server listening on port ${PORT}`)
})
The first thing we did was import the cors npm package. And then we use app.use(cors()) to add cors as an Express middleware function that will run for each request to the application and will accept requests from any origin.
There are a lot more settings you can add to the cors middleware, such as restricting what domains can make requests to your API. But for the purpose of this article, we'll stick with the basic functionality that we just added to our code.
Push the Code Changes to Github
Now that we made some changes to our code, let's push the changes to Github. We can follow the same process as when we made our first commit to Github in the previous section.
First, stage the changes you made:
git add .
You can check the status of what files are staged with:
git status
If everything looks right, create a new commit:
git commit -m "Added cors"
And then push the changes to your Github repository:
git push origin master
Enter your Github username and password if it asks.
When your code has been successfully pushed to Github, you can move onto the next section.
SSH Into Your DigitalOcean Server
Now we need to hop back onto our DigitalOcean server.
SSH into your server with this command (replace the yellow highlighted text with your information):
ssh username@server_domain_or_ip_address
Delete the Current App Directory
We need to delete the current application on your server and replace it with the one we pushed to Github a second ago.
Since we're using PM2 to run our application, it won't be interrupted if/when we remove the current application.
To delete the current application directory:
sudo rm -r app
Since deleting files usually requires sudo privileges, you will need to enter your user password.
When that's done, we're ready to clone our project from Github.
Clone Github Repository
Now let's clone your Github repository to pull the new code onto our server:
Here's the command:
git clone https://github.com/your_github_username/name_of_your_repository.git app
Enter your Github credentials if it asks for them.
Re-Install Npm Dependencies
We need to re-install the npm dependencies for the application to successfully run.
cd into the new /app directory that was created:
cd app
And initiate the installation process:
npm install
When that's finished installing, your project will be ready to start!
Reload PM2
Now we need to tell PM2 to reload and use the new code when it starts up again.
This may cause a few seconds of downtown for your application.
Here's the command:
pm2 reload your_app_name
If you're not sure what the name of your application is inside PM2, you can list out all the PM2 processes running with this command:
pm2 status
Test Your Application
Once you've reloaded PM2, your server will be running the new code with cors added.
Open a browser and make some test requests to the /users and /getUserById API endpoints to ensure everything runs correctly.
If everything works the way you expected, you've successfully deployed code changes to your app!